Rope play is an artistic and intimate activity that combines creativity and connection. It allows you to explore trust and vulnerability while creating intricate designs or bonds. Its appeal lies in the balance of control and freedom, offering a unique way to deepen your relationship. However, safety must always come first. Open communication and clear consent ensure that both you and your partner feel secure and respected. By prioritizing these elements, you can confidently enjoy this practice while fostering mutual trust and understanding.
Key Takeaways
- Always focus on safety. Set clear rules and a safe word.
- Check with your partner often to make sure they feel okay.
- Pick soft ropes like cotton for beginners. They are safer.
- Clean your ropes after using them. Look for damage or wear.
- Choose a quiet, safe place without distractions for rope play.
- Start with easy knots like the single-column tie to learn.
- Keep safety scissors and a first aid kit close for emergencies.
- Talk openly with your partner to get better and enjoy more.
Safety in Rope Play
Consent and Communication
Setting boundaries and safe words.
Before you begin rope play, you must establish clear boundaries with your partner. Discuss what each of you feels comfortable exploring and what is off-limits. This conversation ensures that both of you feel respected and secure. A safe word is essential. It acts as an immediate signal to stop the activity if someone feels uncomfortable or unsafe. Choose a word that is easy to remember and unlikely to come up in casual conversation. For example, “red” is a common choice. By setting these boundaries and agreeing on a safe word, you create a foundation of trust and mutual respect.
Regular check-ins with your partner.
Communication doesn’t stop once you start. Regularly check in with your partner during the session. Ask how they’re feeling and if they need adjustments. Pay attention to non-verbal cues like body language or changes in breathing. These can indicate discomfort even if your partner doesn’t say anything. After the session, take time to debrief. Discuss what worked, what didn’t, and how you both felt. This open dialogue strengthens your connection and helps you improve future experiences.
Safety Essentials
Preventing circulation and nerve issues.
One of the most critical aspects of rope play is ensuring your partner’s physical safety. Improper tying can lead to circulation problems or nerve damage. To prevent this, avoid tying ropes too tightly. You should be able to slide a finger between the rope and the skin. Also, avoid placing ropes over sensitive areas like joints, the neck, or major arteries. Check for signs of poor circulation, such as numbness, tingling, or discoloration of the skin. If you notice any of these, stop immediately and adjust the ropes.
Recognizing discomfort or distress.
Your partner’s comfort should always be your top priority. Watch for signs of physical or emotional distress. These might include wincing, fidgeting, or a sudden change in mood. If your partner expresses discomfort, stop and address the issue right away. Never ignore their concerns. Remember, rope play is about mutual enjoyment. Ensuring your partner feels safe and cared for enhances the experience for both of you.
Tools for Safety
Using safety scissors effectively.
Safety scissors are a must-have tool for any rope play session. These scissors are designed to cut through ropes quickly without harming the skin. Keep them within arm’s reach at all times. Practice using them beforehand so you can act swiftly in an emergency. If a rope becomes too tight or your partner needs to be freed immediately, safety scissors can make all the difference.
Keeping first aid supplies accessible.
Accidents can happen, even with the best precautions. Having a basic first aid kit nearby is a smart move. Include items like bandages, antiseptic wipes, and ice packs. These can help you address minor injuries quickly. Knowing that you’re prepared for emergencies adds an extra layer of security to your rope play sessions.
Tools for Rope Play
Selecting the Right Rope
Comparing materials: cotton, jute, synthetic.
Choosing the right rope is essential for a safe and enjoyable rope play experience. Different materials offer unique benefits and drawbacks, so understanding their characteristics will help you make an informed decision. Here’s a quick comparison of common rope materials:
| Material | Pros | Cons |
|---|---|---|
| Cotton | Soft, beginner-friendly, easy to clean. | Less durable, lower tensile strength. |
| Jute | Lightweight, strong, traditional aesthetic. | Requires maintenance, can be rough on sensitive skin. |
| Synthetic | Durable, resistant to wear, available in vibrant colors. | Less natural feel, may lack flexibility for intricate designs. |
For beginners, cotton ropes are a great starting point due to their softness and ease of use. If you’re looking for durability and a more traditional feel, jute ropes are an excellent choice. Synthetic ropes work well for those who prioritize longevity and vibrant aesthetics.
Choosing appropriate length and thickness.
The length and thickness of your rope significantly impact its usability. For most beginners, a rope length of 25-30 feet is versatile enough for basic ties and knots. If you’re planning more intricate designs or full-body ties, consider longer ropes, such as 50 feet. Thickness also matters. A diameter of 6-8mm is ideal for beginners, offering a balance between comfort and control. Thicker ropes (10mm or more) provide extra cushioning but may be harder to handle for detailed work.
Additional Equipment
Safety scissors and their importance.
Safety scissors are non-negotiable for rope play. These specialized scissors feature blunt tips and angled blades, allowing you to cut through ropes quickly without risking injury. Keep them within reach at all times. Practice using them beforehand to ensure you’re prepared for emergencies. A quick response with safety scissors can prevent minor discomfort from escalating into a serious issue.
Optional items like carabiners or blindfolds.
While not essential, additional tools like carabiners and blindfolds can enhance your rope play sessions. Carabiners allow you to secure ropes more efficiently and experiment with suspension techniques (if you’re experienced). Blindfolds add an element of sensory play, heightening trust and anticipation. Always ensure that any optional equipment you use is safe and comfortable for both you and your partner.
Maintaining Your Tools
Cleaning and storing ropes.
Proper maintenance extends the life of your ropes and ensures safety. Clean your ropes regularly, especially after intense sessions. For natural fibers like cotton or jute, hand wash them with mild soap and air dry completely to prevent mold. Synthetic ropes can often be machine washed, but always check the manufacturer’s guidelines. Store your ropes in a cool, dry place, away from direct sunlight, to avoid weakening the fibers.
Inspecting for wear and tear.
Regular inspections are crucial for identifying potential issues before they become hazards. Follow these steps to keep your ropes in top condition:
- Inspect new ropes for defects and log their condition.
- Before each session, check for fraying, discoloration, or stiffness.
- Every 6-12 months, perform a detailed inspection to assess overall integrity.
- After high-stress use or incidents, conduct an interim inspection to ensure safety.
By maintaining your tools, you not only protect yourself and your partner but also enhance the longevity of your rope play equipment.
Preparing Your Space for Rope Play
Ensuring Safety
Creating a private and hazard-free area.
Your space plays a crucial role in ensuring safe and enjoyable rope play. Start by choosing a private area where you won’t be interrupted. Privacy helps both you and your partner feel relaxed and focused. Next, inspect the space for hazards. Remove sharp objects, clutter, or anything that could cause injury if bumped into. If you’re using furniture or fixtures for support, make sure they’re sturdy and stable. A clean, open area minimizes risks and lets you concentrate on the experience.
Tip: Lay down a soft mat or blanket to protect your partner from hard surfaces and provide extra comfort during the session.
Ensuring comfort for both partners.
Comfort is key to a successful rope play session. Adjust the temperature of the room to ensure it’s neither too hot nor too cold. Provide cushions or pillows for added support, especially if your partner will be in one position for an extended period. Keep water nearby to stay hydrated, as sessions can sometimes be physically demanding. When both of you feel comfortable, it’s easier to focus on the connection and creativity that rope play offers.
Setting the Atmosphere
Using lighting, music, and scents.
The right atmosphere can transform your rope play experience. Start with lighting. Dim lights or candles create a calming ambiance, while colored lights can add a playful or dramatic touch. Music is another powerful tool. Choose soothing tunes to help you relax or rhythmic beats to energize the session. Scents like lavender or vanilla can enhance the mood, but avoid overpowering fragrances that might distract or irritate.
Note: Always check with your partner about their preferences for lighting, music, and scents to ensure the atmosphere suits both of you.
Establishing a calm and focused environment.
A calm environment helps you stay focused and present during rope play. Turn off distractions like phones or TVs. Let your partner know that this time is dedicated to them, creating a sense of intimacy and trust. Organize your tools beforehand so you don’t have to search for them mid-session. When your space feels intentional and serene, it sets the stage for a meaningful and enjoyable experience.
Basic Rope Play Techniques
Beginner Knots and Ties
Single-column tie: Step-by-step guide.
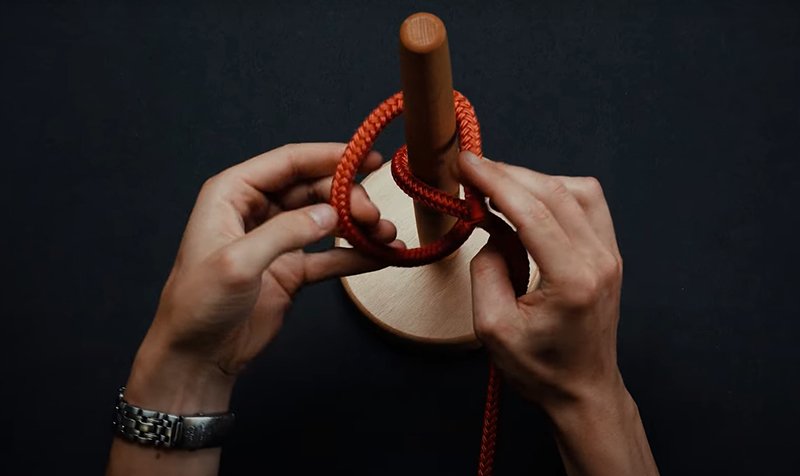
The single-column tie is one of the most fundamental knots in rope play. It’s simple, secure, and versatile, making it an excellent starting point for beginners. Follow these steps to master it:
- Prepare your rope: Start with a length of rope, ensuring it’s free of tangles. Hold one end in your dominant hand.
- Create a loop: Form a small loop by folding the rope back on itself. This will be the base of your knot.
- Wrap around the column: Place the loop against the column (e.g., your partner’s wrist or ankle). Wrap the working end of the rope around the column and through the loop.
- Secure the knot: Pull the working end tight to secure the loop. Ensure the knot is snug but not overly tight. You should be able to slide a finger between the rope and the skin.
- Finish with a safety check: Test the knot by gently tugging on the rope. It should hold firm without causing discomfort.
Tip: Practice this tie on an inanimate object, like a chair leg, before trying it with a partner. This helps you build confidence and precision.
Double-column tie: Step-by-step guide.
The double-column tie is perfect for binding two limbs together, such as wrists or ankles. It’s slightly more advanced than the single-column tie but still beginner-friendly. Here’s how to do it:
- Position the limbs: Place the two columns (e.g., wrists) parallel to each other.
- Wrap the rope: Take the rope and wrap it around both columns twice, ensuring the wraps are even and not too tight.
- Create a cinch: Pass the working end of the rope between the two columns, creating a cinch that holds the wraps in place.
- Tie off the knot: Use a square knot or a similar secure knot to finish. Ensure the knot is easy to untie in case of an emergency.
- Check for comfort: Slide a finger between the rope and the skin to confirm it’s not too tight.
Note: Always communicate with your partner during the process. Ask if the tension feels comfortable and adjust as needed.
Tension and Placement
Achieving safe and comfortable tension.
Proper tension is crucial for safe and enjoyable rope play. The rope should be snug enough to stay in place but loose enough to avoid restricting blood flow or causing discomfort. A good rule of thumb is to leave enough space to slide one or two fingers between the rope and the skin.
Biomechanical studies on body movements highlight the importance of distributing pressure evenly to prevent strain on joints and muscles. When tying, focus on maintaining consistent tension throughout the rope. Avoid pulling too tightly, as this can lead to circulation issues or nerve damage.
Tip: Practice achieving the right tension on yourself first. Wrap the rope around your wrist and adjust until it feels secure but comfortable.
Avoiding sensitive areas like joints and the neck.
Placement is just as important as tension. Avoid tying ropes directly over sensitive areas such as joints, the neck, or major arteries. These areas are more prone to injury and discomfort. Instead, focus on tying around larger, fleshier parts of the body, like the thighs or upper arms.
Research on climbing techniques emphasizes the risks of improper pressure on joints, which can lead to musculoskeletal injuries. Applying this knowledge to rope play, you should always prioritize safety by avoiding high-risk areas.
Reminder: Regularly check for signs of discomfort, such as numbness or tingling, and adjust the ropes immediately if needed.
Learning Resources
Recommended books and online tutorials.
Learning rope play techniques requires patience and practice. Fortunately, there are plenty of resources to guide you. Books like The Two Knotty Boys Showing You the Ropes and Shibari You Can Use offer step-by-step instructions and illustrations for beginners. Online platforms like YouTube and FetLife also provide tutorials from experienced practitioners.
Structured learning environments, similar to those used in medical education, can significantly enhance your skills. These resources break down complex techniques into manageable steps, making it easier for you to learn and apply them.
Joining workshops or local communities.
Workshops and local communities are excellent for hands-on learning. Many cities have rope play groups that host events and classes for beginners. These gatherings provide a supportive environment where you can practice under the guidance of experienced mentors.
A 12-week program for middle school students demonstrated that structured activities improve skills and confidence. Similarly, joining a rope play workshop can accelerate your learning and help you build connections with others who share your interests.
Pro Tip: Look for workshops that emphasize safety and consent. These are the hallmarks of a responsible and trustworthy learning environment.
Practicing Rope Play with a Partner
Building Trust
Discussing expectations and desires.
Trust forms the foundation of any successful rope play session. Before you begin, take time to discuss your expectations and desires with your partner. Share what excites you about the experience and listen to their thoughts as well. This open dialogue ensures that both of you feel heard and respected.
To deepen trust, try activities that foster connection and understanding. For example:
- Engage in an Eye Contact Exercise to build empathy and self-awareness.
- Practice the Perfect Square activity, which emphasizes non-verbal communication and teamwork.
- Explore the Human Knot, a fun exercise that encourages patience and collaboration.
- Conduct an Emotional Check-In to openly share feelings and create a safe atmosphere.
These exercises not only strengthen your bond but also prepare you to communicate effectively during rope play.
Checking in during and after sessions.
Trust doesn’t stop at the planning stage. During the session, check in with your partner regularly. Ask how they’re feeling and watch for non-verbal cues like body language or changes in breathing. These small gestures show that you care about their comfort and safety.
After the session, take time to debrief. Discuss what you both enjoyed and what could be improved. This reflection helps you grow together and ensures that future sessions are even more enjoyable.
Starting Slowly
Practicing simple ties first.
When you’re just starting, simplicity is key. Begin with basic ties like the single-column or double-column tie. These foundational techniques are easy to learn and provide a safe starting point for exploration. Practicing these ties builds your confidence and helps you develop muscle memory.
Use an inanimate object, such as a chair leg, to practice before tying on your partner. This approach allows you to focus on technique without the added pressure of ensuring your partner’s comfort.
Gradually increasing complexity.
Once you’ve mastered the basics, you can gradually explore more intricate designs. Add new knots or experiment with different patterns to keep things exciting. However, always prioritize safety and communication. Each new technique should feel like a natural progression, not a leap into the unknown.
Remember, rope play is a journey, not a race. Taking your time ensures that both you and your partner feel confident and connected every step of the way.
Feedback and Improvement
Encouraging open communication.
Constructive feedback is essential for improving your rope play skills. Encourage your partner to share their thoughts openly. Ask specific questions like, “Did the tension feel comfortable?” or “Was there anything you’d like me to adjust next time?” This dialogue creates a collaborative environment where both of you can grow together.
To make feedback more effective, tailor it to your partner’s learning style. Some people prefer verbal explanations, while others might benefit from visual demonstrations. Adapting your approach ensures that feedback is clear and actionable.
Adjusting techniques based on feedback.
Feedback is only valuable if you act on it. Use a structured approach like the “Situation-Behavior-Impact” model to understand what worked and what didn’t. For example, if your partner mentions discomfort during a specific tie, identify the cause and adjust your technique accordingly.
Timeliness also matters. Address feedback shortly after the session while the experience is still fresh. This practice reinforces learning and helps you make immediate improvements. By fostering a two-way dialogue, you create a dynamic where both partners feel valued and supported.
Tip: Treat feedback as a tool for growth, not criticism. A positive attitude makes the process more enjoyable and productive for both of you.
Troubleshooting in Rope Play
Avoiding Mistakes
Preventing overly tight or loose knots.
Knots that are too tight can cause discomfort, restrict circulation, or even lead to nerve damage. On the other hand, loose knots may fail to hold, compromising safety and ruining the experience. To strike the right balance, always tie on the fleshier parts of the body, such as the thighs or upper arms, where muscles provide natural cushioning. Avoid tying directly over joints, as these areas are more vulnerable to injury.
Expert Tip:
“Most rope practitioners are warned early on to avoid tying tightly around joints. Not only are joints weaker areas of the body, but nerves are typically exposed in these areas, so compression is more likely. In addition, the general advice to tie on the meaty parts of the limb or body is also helpful, as muscles tend to protect the nerves.”
Practicing on inanimate objects, like chair legs or foam cylinders, can help you develop a feel for proper tension. Regular practice ensures your knots are secure yet comfortable, enhancing both safety and enjoyment.
Conducting thorough safety checks.
Safety checks are non-negotiable in rope play. Before starting, inspect your ropes for fraying, stiffness, or other signs of wear. During the session, monitor your partner for signs of discomfort, such as changes in skin color, numbness, or tingling. These could indicate circulation issues or nerve compression.
A systematic approach to safety can make all the difference:
- Before the session: Double-check your tools and ensure your space is hazard-free.
- During the session: Perform regular check-ins with your partner and adjust as needed.
- After the session: Review what worked and what didn’t to improve future experiences.
By making safety checks a habit, you minimize risks and build trust with your partner.
Addressing Issues
Responding to circulation problems.
Circulation problems can arise if knots are too tight or placed incorrectly. Signs include coldness, discoloration, or numbness in the tied area. If you notice any of these, act immediately. Loosen or remove the ropes and gently massage the affected area to restore blood flow.
Keep safety scissors within reach at all times. These tools allow you to cut through ropes quickly in emergencies. Practicing with safety scissors beforehand ensures you can respond swiftly and confidently when needed.
Safely untangling knots in emergencies.
Knots can sometimes become tangled, especially during intricate designs or prolonged sessions. If this happens, stay calm. Avoid pulling on the rope, as this can tighten the knot further. Instead, work methodically to loosen the rope, starting from the outermost loops.
For severe tangles or emergencies, use your safety scissors to cut the rope. While this may damage your equipment, it’s a small price to pay for your partner’s safety. Regular practice and preparation reduce the likelihood of encountering such issues, but being ready for them ensures you can handle them effectively.
Learning from Experience
Reflecting on mistakes and improving.
Mistakes are inevitable, especially when you’re learning. Instead of viewing them as failures, treat them as opportunities to grow. After each session, take time to reflect. Ask yourself:
- What went well?
- What could have been better?
- Did my partner feel safe and comfortable throughout?
Keeping a journal of your experiences can help you track your progress and identify patterns. This habit not only improves your skills but also deepens your understanding of your partner’s preferences and needs.
Seeking advice from experienced practitioners.
Learning from others can accelerate your growth. Join local rope play communities or attend workshops to connect with experienced practitioners. These environments provide valuable insights and hands-on guidance.
You can also adopt professional troubleshooting methods to refine your skills:
- Training and Simulation: Practice regularly to build confidence and prepare for real-time problem-solving.
- Documentation and Review: Keep detailed records of your sessions to identify areas for improvement.
- Root Cause Analysis (RCA): Analyze mistakes to uncover their underlying causes and prevent them in the future.
By seeking advice and continuously learning, you ensure that each session is safer, more enjoyable, and more fulfilling for both you and your partner.
Mastering rope play begins with a commitment to safety, preparation, and open communication. By using the right tools, creating a comfortable space, and practicing foundational techniques, you can build confidence and deepen your connection with your partner. Take your time to learn at your own pace, and don’t rush the process. Growth comes with patience and practice.
For continued learning, explore books, online tutorials, or local workshops. These resources will help you refine your skills and expand your creativity. Start your journey today, and enjoy the rewarding experience of this art form.
FAQ
What is the best rope material for beginners?
Cotton ropes are ideal for beginners. They feel soft on the skin, are easy to handle, and require minimal maintenance. If you’re just starting, this material ensures comfort and safety while you practice basic techniques.
How do I know if the rope is too tight?
Check by sliding one or two fingers between the rope and the skin. If you can’t do this easily, the rope is too tight. Watch for signs like numbness, tingling, or discoloration, and adjust immediately.
Can I practice rope play alone?
Yes! Practicing on inanimate objects like chair legs or foam cylinders helps you build confidence and refine your technique. Solo practice is a great way to master knots and tension before involving a partner.
How do I clean my ropes?
Hand wash natural fibers like cotton or jute with mild soap. Let them air dry completely to prevent mold. For synthetic ropes, check the manufacturer’s guidelines—some can be machine washed for convenience.
What should I do if my partner feels discomfort?
Stop immediately and address the issue. Loosen or remove the ropes and check for circulation problems. Always prioritize your partner’s safety and comfort. Open communication ensures a positive experience for both of you.
Are there any risks involved in rope play?
Yes, risks include circulation issues, nerve damage, or emotional discomfort. You can minimize these by practicing proper techniques, using safety tools like scissors, and maintaining open communication with your partner.
How can I improve my rope play skills?
Explore books, online tutorials, or workshops. Join local communities to learn from experienced practitioners. Regular practice and feedback from your partner will also help you grow and refine your techniques.
Do I need special tools besides ropes?
Yes, safety scissors are essential for emergencies. Optional tools like carabiners or blindfolds can enhance your experience. Always ensure any additional equipment is safe and comfortable for both you and your partner.
Tip: Start simple and focus on safety. As you gain confidence, you can explore more advanced techniques and tools.